About dancingmonkey: dancingmonkey has been playing Warmachine for a very long time. He's played in the UK Masters and fought a variety of players. His careful and very decisive play style has laid low many a player and is amazing to watch when he pulls tricks from his wide repertoire. His preferred list is usually a couple units of infantry to maim enemy infantry and then warjacks to get the job done. He's an awesome guy to play and his fighting style can change like the flick of a switchblade. His current favourite casters are Deneghra, eDeneghra and eSkarre. He's been Press Ganging in London for quite a while and his stomping grounds are the The Cross Gaming Club and his home club, Tanelorn. I definitely recommend you have a chat with him when you meet him as he's a cool cat and his wit is laser sharp. :D
dancingmonkey's List: Sunshine Skarre and the Super Friends
Type: Skirmish (1 caster, 50pts)
Points: 50
Skarre, Queen of the Broken Coast (*6pts)
* Deathripper (4pts)
* Deathjack (12pts)
* Leviathan (9pts)
* Skarlock Thrall (2pts)
Bloodgorgers (Leader and 9 Grunts) (8pts)
Necrosurgeon & 3 Stitch Thralls (2pts)
Satyxis Raiders (Leader and 9 Grunts) (8pts)
* Satyxis Raider Sea Witch (2pts)
General Gerlak Slaughterborn (3pts)
Necrotech & 1 Scrap Thrall (1pts)
Pistol Wraith (3pts)
Warwitch Siren (2pts)
I didn't find out the name of his list so I gave it something fun and upbeat like Skarre would have liked. This list contains the Deathjack, this is the first time I'd ever seen dancingmonkey use him and I shat bricks when he hit the field. The Satyxis Raiders benefited from Skarre's Inspiration and with the Sea Witch, they'd play a forward assault/skirmish role. Gerlak and his badasses, the Bloodgorgers provided a strong backbone to the army with the ability to munch through units with too much worry. The Pistol Wraith would retain his role as one of the most maligned models in the Cryx arsenal with his amazing set of abilities and the added bonus of being able to literally shoot the shit out of a unit that has been subject to Black Spot. The Siren would slay units with her spray provide focus with Power Booster and the Skarlock would provide spells with his Spell Slave ability. The Necrosurgeon would be available to patch up Skarre's self-inflicted injuries and her thralls would happily take shots that come her way. All in all, the list is highly flexible with the ability to kill multiple models and play either as a fast moving direct assault force or as a meat grinder with loads of ways of killing many, many models.
My List: A Frank Exchange Of Views
Type: Skirmish (1 caster, 50pts)
Points: 50
Supreme Kommandant Irusk (*5pts)
* Devastator (9pts)
Great Bears of Gallowswood (5pts)
Iron Fang Pikemen (Leader and 9 Grunts) (8pts)
* Iron Fang Pikemen Officer & Standard (2pts)
Kayazy Assassins (Leader and 9 Grunts) (8pts)
* Kayazy Assassin Underboss (2pts)
Winter Guard Infantry (Leader and 9 Grunts) (6pts)
* Winter Guard Infantry Officer & Standard (2pts)
Winter Guard Mortar Crew (Leader and Grunt) (3pts)
Winter Guard Mortar Crew (Leader and Grunt) (3pts)
Eiryss, Angel of Retribution (3pts)
Kovnik Jozef Grigorovich (2pts)
Saxon Orrik (2pts)
Due to a ridiculous fiasco when in a rush to leave my house, I'd forgotten Alexia and her twenty Risen. This was terrible as I'd built this list to benefit from my models dying to enemy fire and killing the enemy to gain more Risen. When dancingmonkey told me that his Cryx force included a whole swathe of living models, I almost cried. Instead of using that mentalist with her posse of knobbers, I had instead to use Saxon Orrik and epic Eyriss. Terrence, my ever suffering Devastator was back with his Bond to Irusk giving him immunity to Knockdown and +2 Defence. The Great Bears would be ready to strike at hard targets from through my lines thanks to Irusk's Martial Discipline. The Iron Fangs would also make a beeline for hard targets and generally make nuisances of themselves with Defensive Formation. The Kayazy Assassins were there to kill targets ranging from infantry to jacks under Battle Lust. And then we come to the new guys, Captain Banana Skin (Kovnik Joe) and his gang of Blunderbuss wielding madmen. I'd decided to include these guys in my army after playing Aries37 and getting my shit ruined by them. Their versatility and ability to provide a moving screen of dangerous models made them especially useful. My two Mortars were back, I'd missed their savage blast damage quite badly when using Kommandant Irusk and I needed to feel whole again. Epic Eyriss was included to strip enemy upkeeps (by shooting my guys) and go around Disrupting targets. Finally we come to Saxon Orrik. Saxon provides my army with the one thing I'd wanted since I'd read Rupert Carvolo's rules in Escalation. Pathfinder to units. This would free up Irusk's focus as he wouldn't need to spam Artifice of Deviation as much. Saxon currently has a typo on his card confirmed by PP Rules Guru Mootaz on the Privateer Press Forums. Here's the link: Here.
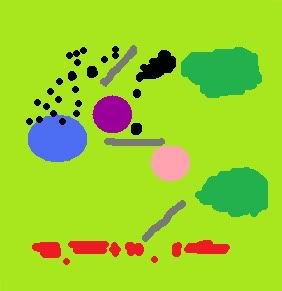
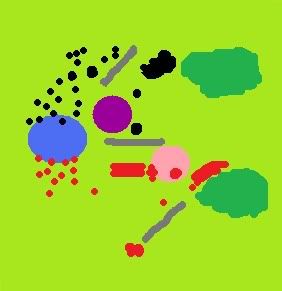
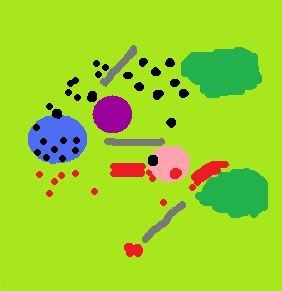
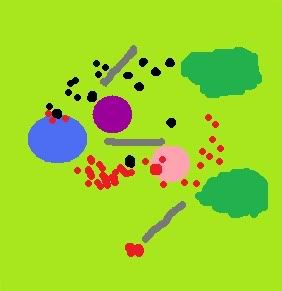
Battlefield: The battlefield included a swimming pool and also included a couple sets of walls to break up an open field. Two forests were placed as symmetrically as possible. The north is edge is dancingmonkey's Deployment Zone and the South is mine. The Objective Marker that I'd have to defend is hot pink and dancingmonkey's is a rather sexual purple. Again these drawings were done using a 001 pen on a piece of graph paper over the course of 13 hours and then scanned into my computer and touched up on MSpaint. My forces are in red and dancingmonkey's are in black. A key was ommitted due to time constraints.
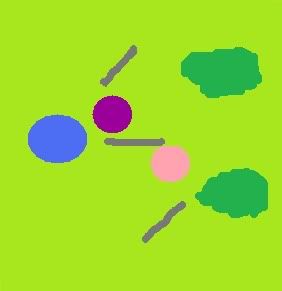
dancingmonkey's Deployment:
Having won the roll off, dancingmonkey took the initiative and decided to go first. This would allow him to get the jump on the objective and help solidify his gains in later turns. Skarre was deployed to the central-west with her Leviathan and Deathripper ahead of her. The Skarlock was deployed to her east with the Necrosurgeon to the west. The Bloodgorgers and Gerlak were deployed as centrally as possible.
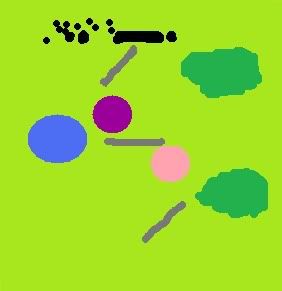
My Deployment:
With the objectives in the centre field I needed to make sure my army was read to take the objectives as soon as possible to make up for the loss of the first move advantage. Terrence was deployed directly facing my objective with Irusk directly facing my opponents objective behind the Great Bears. I put the Iron Fangs to the west of Irusk in two ranks and Shield Wall and my Kayazy were placed to the west of them facing the swamp. Behind the Kayazy, I deployed Saxon. To my east I deployed my Winterguard blockade with Kovnik Joe with the objective of intercepting any models that try to get their way through the Devastator.My Mortars were deployed together on my deployment line as centrally as possible.
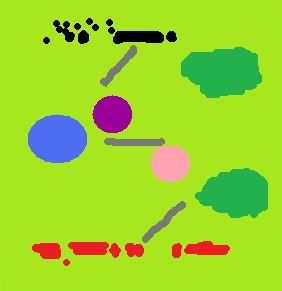
dancingmonkey's Advance Deployment:
The goddamn Deathjack was deployed facing Terrence. This was not a good sign, that would provide an awful lot of damage soak for his army should I charge it but also it would allow the Bumgorgers to countercharge any unit that aimed to do that. Also the Deathjack would have a direct line to my objective. The Satyxis were deployed facing the swamp and with the War Witch, my Mortars would be useless until the she was dead thanks to her Force Barrier.

My Advance Deployment:
Having seen the tide of models been laid down during dancingmonkey's Advance Deployment, I deployed my lone Eyriss within my own lines facing the Deathjack to hopefully Disrupt him and strip any horrible spells he would have on him.
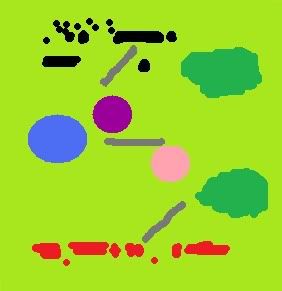
dancingmonkey's Turn 1:
Allocating one focus to the Leviathan, dancingmonkey began his turn. Every model, except the Warwitch Siren and Skarlock ran forwards. The Warwitch applied one focus to the Leviathan so it could run and the Skarlock cast Admonition on the Deathjack. Even the mighty Deathjack gunned it's infernal boilers and proceeded to stamp it's way towards the objective. Skarre put Death Ward on Gerlak and advanced.
My Turn 1:
When I saw the Deathjack piling down field, I got a really bad feeling in my stomach. With his tough trollkin running down the field towards my Winterguard I knew that one more turn and we'd hit combat. That was not a good feeling. Irusk allocated one focus to Terrence and kept the rest for himself. Saxon started festivities by moving up field and using his Recon ability on the Kayazy Assassins. Terrence ran up the field and onto the edge of my own objective.I knew that if Irusk used FFE, then Tactical Supremacy on the IFP I'd have a pretty good chance of trapping the Deathjack, Bumgorgers and the Satyxis in the centre field after using Desperate Ground and then charging. I went for it. Irusk cast the spells (including Energizer for two) and then failed charged a troll on the east flank. Terrence was now completely within the objective. The Great Bears ran infront of Irusk to save his ass and the Winterguard ran up the east flank to get in position to intercept Gerlak and his savages. My mortar without FFE fired at the Deathjack but it killed nothing, and my second Mortar tried the same but ended up deviating and killing a troll. The Kayazy Assassins ran forward, but tried to keep out of melee range with the Satyxis. The IFP advanced in Shield wall and then at the end of the turn Tactical Superiority'd towards the centre of the table. Hopefully the trap was set. The Bloodgorgers, the Satyxis, the Deathjack and Gerlak were all in my feat effect and I hoped it would stall their advance.
dancingmonkey's Turn 2:
Cutting herself for two damage, Skarre upkept Death Ward and Admonition. One focus was applied to the Deathripper and the rest was kept on Skarre. The Deathripper ran through the Piston Wraith and was in position to Channel spells at the Kayazy. Then Skarre activated and advanced. She used her feat, Fate Weaver on four targets. The Deathjack, Gerlak, the Leviathan and herself. This meant none of these models could be targetted by attacks or charged. She then cast Black Spot out of the Deathripper at an unengaged Kayazy, but the spell missed due to Stealth. Then she recast it with a boost and tagged the Kayazy. Things were not looking good. Then she fired a Perdition at a Kayazy but the shot missed because of the DEF boost on the Kayazy in combat and their own Duelist rule (Which cancelled out Black Spot's debuff) then finally she cast it again and caught a Kayazy not engaged in combat. The Deathjack then Advanced towards Irusk. Shit was looking bad. Then the Pistol Wraith advanced and took couple shots at the Kayazy. Luckily Stealth and being engaged saved their asses and I lost one to the sneaky bastard. Finally the Satyxis advanced and started using their Lacerators and Horns to cut more Kayazy up. Black Spot triggering more attacks and thus more casualties. I'd complete fucked up the previous turn and ran my Kayazy too far forward thanks to SPD 7 on the Satyxis. Things were looking ultra shit. The Deathjack advanced and proceeded to rape two of the Great Bears even though I'd made two tough rolls. Even worse was the fact that the goddamn monster had Admonition on it. Gerlak ran 6" towards my Winterguard. This was terrible business as I wouldn't be able to target him with shots. The rest of the army moved into position further south. The Necrosurgeon stitched up Skarre's wounds and the turn ended.
My Turn 2:
Shit was looking terrible, the Deathjack was in my face and under Fate Weaver and Admonition on it. Gerlak was readying for a charge of horrendous damage against my Winterguard. The Kayazy were heavily damaged and my forces had to deal with the prospect of a Deathjack in my lines that could not be targetted by attacks. Terrible shit. I started my turn by upkeeping Fire For Effect and dropping Tactical Supremacy. I would need the focus for trying to escape the Deathjack. Next I activated Saxon and provided the Kayazy with Recon skills. Next Irusk activated and cast Tactical Supremacy on himself, Artifice of Deviation on the Deathjack's head and Energizer for one. Terence slid forward. Then he proceeded to charge one of his own Kayazy through the Iron Fangs and promptly killed him. Luckily he'd gone the full 9" away from the Deathjack but I wasn't out of the rough yet. Then Terence the fat bastard advanced into the Deathjack at entirely the wrong angle which enabled the monster to advance through the Artifice and round the front of the IFP Well done you fat bastard. The Winterguard with Kovnik Joe advanced under Bob and Weave and began shooting the Bumgorgers with boosted Sprays and shots. The sprays were largely ignored when they were fired at Gerlak thanks to his ridiculous armour so I contented myself with trying to tag as many targets as possible. Which included a Satyxis and a few Trollkin. The Kayazy Assassins used their mini-feat Kill Stroke and charged through the Satyxis into the Sea Witch of the unit and the Deathripper. The first attack missed but the second one hit home and removed the Force Barrier from the rest of the Witches. The Underboss proceeded to stab the shit out of the Deathripper and luckily took the Arc Node off it's back. The Fire For Effect Mortar fired at the Satyxis tagging three models that immediately vaporised and the second one fired and killed some more and the Pistol Wraith (Dodgy bastard). Finally the Iron Fangs charged and used Defensive Formation to cause even more damage to the Deathripper taking out it's movement and killed off the rest of the Satyxis with CMA's. Then they snapped back into a blockade in Shield Wall in front of Irusk facing the Deathjack to attempt to save his ass from the inevitable Perdition Trample that was coming. Eyriss ran as she had no clear targets. Irusk then slid back a couple inches and my turn ended.
dancingmonkey Turn 3:
Skarre dropped Admonition and cut herself to upkeep Death Ward. Allocating another three to the Deathjack, she readied it for the kill. The Deathjack had five focus on it after cooking the souls from last turn and the allocated focus from Skarre to take it to eight. Also it was in position to try the craziest trample ever. First, Gerlak charged into the Winterguard on the east. I was expecting for him to absolutely ruin their shit. But luckily for me dancingmonkey's terrible luck kicked in an he only rolled a three to hit so Gerlak's killing spree ended. The Deathjack cast Perdition on a Iron Fang in Base Contact. It hit with the spell but failed to exceed damage until it spent one focus using Seas of Fate to boost the damage. It then advanced towards the nearest enemy model (another Iron Fang) and then began it's Trample. It contacted four IFP and the last remaining Great Bear and so ended up right in front of Irusk. Then the Free Strikes from the Iron Fangs that were out of contact range were rolled. Initially I forgot that they got +2 to hit because it was a free strike but we rectified it and five free strikes struck home. After rolling repeatedly high on the damage rolls, the Deathjack's movement was disabled and it's activation immediately ended. At that point we both decided to end the game.
Post game thoughts:
My Iron Fangs acquitted themselves very nicely this game by being Irusk's bodyguards. I was absolutely shitting myself when Fate Weaver went down on the Deathjack and I couldn't deal with it. I won't be so hasty to attempt to spring a trap again. Also the huge amount of additional moves the Deathjack was able to generate was mind blowing. I'd never seen the Deathjack so rampant except with Mortenebra. I understand why people fear it so much in MK2. It's downside of going crazy removed, it can literally doom your opponents models to an agonising death. I should have used Terrence to kill off Slaughterborn but I'd muddled up the activation order and should have never gone near the Deathjack. All in all the game was enjoyable but very stressful with all the chicanery that was available on both sides of the table. I won't be up for facing Epic Skarre again very soon.

No comments:
Post a Comment